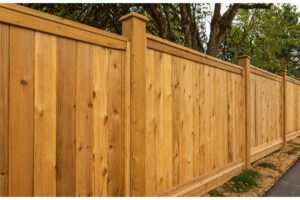
Learn how to construct a sturdy wooden fence in this helpful guide.
LEAD TIMES: SHEDS – 4 WEEKS, FIREWOOD – 1 WEEK, TIMBER – WITHIN 5 WORKING DAYS
There were some pretty intense winds and showers over the Christmas holidays and it may have taken its toll on your perfect garden fence, forcing you to get stuck into some fence repair Google searches.
As soon as you notice a chip or crack in your fence, or notice that they are wobbly, slanted, or rotten, then the whole structure is in danger of collapse and needs strengthened – pronto!
Fence repair might not be very high on your list of priorities in the New Year, but if you put in the time just now to fix your fence panels and posts, you’ll save yourself a lot of time and money in the long-run, preventing further damage.
If you missed our winter fence preparation blog, this fence post repair guide is just what you need!
As always, make sure you have your protective gear on before cracking on with the DIY.

It might look minor just now (or maybe it is actually a major split!) but a crack in your fence panels or posts may lead to the demise of your entire fence structure!
It’s important to act fast and zip it all back together, and luckily, as long as the damage isn’t too severe, you can carry out this fence repair quite simply.
Get your hands on some waterproof glue, designed specifically for wood and outdoor use. Clean any loose debris out of the post split gap.
Dip a paintbrush into the glue and force it inside the split from the top down, coat it thoroughly and thick enough that it’ll hold together.
Using strong clamps, hold the split glued wood together and leave it to dry for several hours, preferably overnight.
When you remove the clamps, the glue should have set and there will be a slightly visible seam where you’ve sealed it together.

If you notice that any of your fence panels or posts are rotten beyond repair, they will need removed and replaced.
It won’t be a straightforward process of yanking out the offending component and planting a new one in – you need to carefully detach the component from the healthy fence panels so you don’t cause further damage to the structure.
Using a shovel, dig out the base of the fence post. If it’s set in concrete you’ll need the right equipment to crack into it. Clear out the hole of any debris, including wooden splinters, slivers of concrete, and anything else you don’t want trapped under the post/panel for eternity.
Have your replacement post/panel handy. It needs to be the same size as the rotten one in order to fit perfectly into the hole in the concrete. The wood should be coated with a good layer of wood preservative and allowed to properly dry before placing it in the ground, to prevent another rotting episode.
Place the new post into the hole, bracing it temporarily so it is level. After all this hard work, you don’t want a slanted fence! Pour in new concrete footing around the base of the post, ensuring that the concrete slopes downwards to stop water pooling at the base, soaking into the post.
Seal the base with a waterproof filler once the concrete footing has completely dried and reattach the other parts of the fence structure. It should be completely secured, protected from the rest of the season’s harsh weather!

Your fence might be rather wobbly after the gail force Scottish winter winds but this is a fairly easy fence repair.
The fence panels/posts are likely wobbly because the wood is shrinking inside the concrete footing. Squeeze some waterproof filler into the gaps and allow to dry, and it should stay in place.
Alternatively, if there is no concrete footing at the base of your fence, you can add in a support post beside the wobbly post to strengthen it. This second post will be thinner but the same width as the wobbly post. Drive it a few feet into the ground and bolt the two posts together.

When a fence begins to lean forwards or backwards, it’s also a straightforward fence repair.
Again, you’ll need to detach the leaning posts/panels from the surrounding fence structure.
Dig up the post from the concrete, breaking all the footing up and clearing it away.
Reset the post into position, ensuring that it is level. Brace it to keep it standing straight and tall, and pour the new concrete footing in.
When the footing has set, reassemble the fence using new galvanised nails, making sure everything is tight and strong.

Here at Stewart Timber, we are passionate about building wooden structures, like fencing and decking, that will last a lifetime.
With the right installment and maintenance, your investment in good quality, pressure-treated timber will be long-lasting.
If you need a hand working out how much your project will cost you, have a look at our fencing calculator, as well as our blog post which explains all the important details to bear in mind.
For any other queries or concerns, contact us directly – we are always happy to help!

Learn how to construct a sturdy wooden fence in this helpful guide.

The Perfect Garden Fence: Guide To Wooden Fence Panel Choices
A fence can be one of the most overlooked (literally), yet essential, part of your garden. Sure, they aren’t as exciting as a beautiful flower bed or as whimsical as a feature pond, but they provide so much more to your garden that you might just take for granted. The right fence can provide: Privacy […]

Timber merchants supplying decking, fencing, sheds & timber products to Glasgow, Edinburgh and surrounding areas.

Enter your postcode to check whether we can deliver to you. If not, you can still collect from our store.

Your delivery total will be calculated in your basket, pick up is always free.
Continue Shopping
but you can still pick up from our yard for free.
If your order is over £500 we may be able to make special allowances contact us to enquire about this.
Continue Shopping